How To Build A Wine Cellar in 9 Steps
Building a wine cellar? Not sure where to start?
Whether you were an enthusiast from the first sip or took years to appreciate a fine Merlot, you’ve undoubtedly amassed an impressive collection of wine. Even if your collection is relatively small, you need a place to store those valuable bottles to maintain them at their best. Since wine perishes, and the way in which it’s stored impacts its flavor, proper storage is essential. In fact, storage and handling affect wine’s taste just as much as the way it’s made does. That is why it is key to take a thoughtful approach to wine cellar design.
Here we outline important considerations and steps to follow when building a wine cellar. But if you’re not quite ready to digest all these tips, simply download our free catalog, request a design quote, or use our DIY design tool.
Step 1: Identify the Purpose of Your Wine Cellar
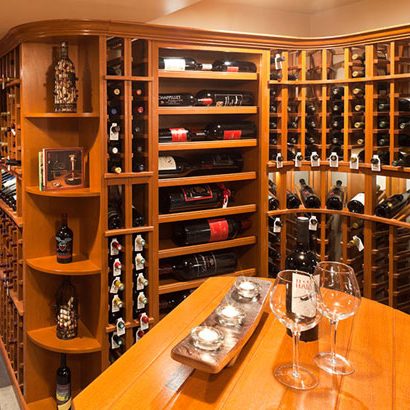
Will your wine cellar simply be for functional long term storage or more of a showcase for your wine?
How many bottles and what types of wine will you be storing?
Knowing the answer to these questions will help you determine the wine cellar size that will meet your needs. This will guide the entire process of building a wine cellar.
Step 2: Determine Your Wine Cellar Size
The size of your wine cellar will depend on how many bottles you wish to store and how much space you can devote to it. Our DIY wine cellar design tool is a great tool to help you understand the space you will need, the materials to use and the average construction costs.
Step 3: Choose Your Wine Cellar Location
The most important consideration when building a wine cellar is its location. A popular question we get is “Can I put a wine cellar anywhere in my home?” Yes, your wine cellar can be located anywhere in the home. You can convert a small room or closet or space under your stairs into a wine cellar, but the most popular location to renovate is the basement since it tends to be cooler.
The location chosen determines many other factors affecting the cost of building and maintaining the cellar. The ideal temperature and humidity for a wine cellar is in the 55°F and 60% relative humidity range. If you select a cooler, more humid location, the cooling system will not need to work as hard so a smaller cooling system may be adequate. This may translate to lower energy costs. Conversely, a warmer location means the cooling system will run more frequently and a larger system may be required. Construction cost may also increase as additional insulation may be required.
Step 4: Wine Cellar Temperature
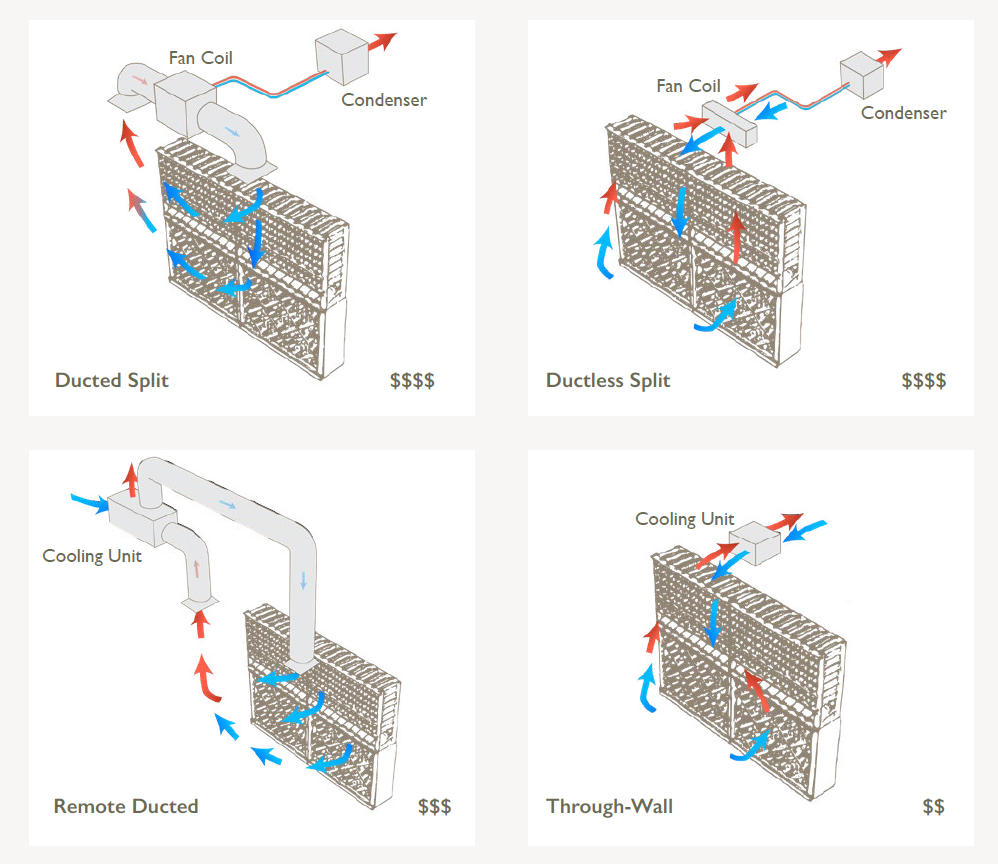
What Cooling System Works?
Your wine cellar should be placed in the coolest, most humid area in your home. The closer the wine room is to an ideal wine cellar temperature of 55° F and 60-65% Relative Humidity, the more efficient the cooling system will be. Any warmer and your wine will age faster; any cooler and your wine will age slower.
The location and size of the wine cellar will determine what cooling system is going to work best for the space. Some wine cellar cooling systems have strict requirements for installation. For example, a through the wall cooling system cannot vent directly into living space. So if your wine cellar is in the center of your living space, this system would not be a fit for you. A ducted or ductless system would be a better choice. The selection of and planning for a wine cellar cooling system should done prior to the wine cellar framing stage.
Step 5: Do I Need a Vapor Barrier?
The application of vapor barrier is critical to the maintaining the correct environment and preventing moisture from forming inside your wine cellar walls. The method used will depend on what insulation material is being used.
- If traditional batting or rigid foam is to be installed, then you must wrap the walls and ceiling with a 6mil poly vapor barrier so the room is completely sealed.
- If the cellar is not in a basement, you will need to install the vapor barrier and insulate the floor as well. Be sure to tape all of the joints of poly with moisture resistant tape and be sure to seal all outlets and lighting fixtures that penetrate the barrier.
Insulation Considerations
- Insulation isolates your wine cellar from exterior elements and helps to maintain a cool, moist environment for your wine. It will keep your passive cellar from becoming too warm and will help to conserve energy for a wine room that is actively cooled by a system.
- Non-cement floors with living or crawl spaces below must be insulated with rigid foam, spray-in insulations-preferably closed cell, or traditional fiberglass batting. Vapor barrier must also be applied on these surfaces as well.
- Walls must be insulated with a minimum value of R-19 and ceilings must be insulated with a value of R-30. R-value indicates the ability of the insulation to restrict heat flow — a higher R-value indicates better insulation.
- When applying traditional fiberglass batting, make sure to orient the paper or foil barrier toward the warm side of the wine cellar wall. Seal all joints with a foil-backed tape.
- When insulating your wine cellar, more is always better. Standard fiberglass rolls or batting provide an R-value of approximately 3 per inch.
Step 6: What Should I Frame and Insulate in My Wine Cellar?
Frame all cellar walls (even concrete walls) using standard 2×4 or 2×6 studs. Keep in mind the thicker the wall depth, the more insulation and higher R value can be achieved. You may even need to insulate the ceiling and floor depending on your substrate materials. Once the framing is complete, you will want to run the electrical and plumbing for lighting and your cooling system prior to insulating.
If you are using spray in closed cell foam insulation, this acts as a vapor barrier as well as an insulator so the 6 mil poly step in the vapor barrier process is not necessary.
Step 7: Determine Your Materials
After the cellar is framed, sealed, insulated and all electrical and plumbing has been roughed in, you will chose your wall, ceiling and flooring materials.
- A moisture resistant drywall/plywood material is fine for walls and ceiling. We recommend DensArmor Plus® Interior Drywall. You can also use 1/2″ moisture-resistant gypsum wall board or green board is the most common and cost effective wall material. This wall board must be painted with a moisture resistant paint.
- Rot resistant hardwoods are an attractive alternative and while more expensive to purchase and install, provide a superior appearance and require no long-term maintenance. Wood paneling works well for this also.
- For flooring, you want to choose a flooring material that will hold up in the cool humid wine cellar environment. Tile, stone and brick work well as does wine barrel flooring that is made from recycled wine barrel staves.
Step 8: Choose Your Entry Door
Your wine cellar entry door is the first chance to make a first impression. It should be both functional and beautiful. Because the wine cellar is a conditioned space, you want to make sure that the entry door is exterior grade with weather stripping for a tight seal. In the case of glass doors, make sure the wine cellar door includes high R-Value glass panels. Our Classic and Value Classic doors are the perfect solution.
It is preferable to have your wine cellar door swing into the wine cellar, but make sure that its swing path does not interfere with your wine racks. The positive pressure in a conditioned wine room will push the in-swinging door against the jamb and weather stripping, creating a superior seal. Before ordering your door you must determine its swing; in or out, and left or right. Make sure to provide this information to whomever you choose to manufacture your wine cellar door.
When choosing a door with a glass panel, make sure that the panel is dual paned, insulated glass. The higher the R-value, the better. All Vigilant glass doors include Argon filled, insulated, tempered glass panels that offer twice the R-value than standard insulated glass.
Step 9: How Do I Begin The Wine Storage Design Process And Select The Proper Wine Rack Components?
First you need to determine your particular wine storage needs and preferences. Do you prefer individual bottle storage or bulk/bin storage? Do you need storage for wood wine boxes, large format bottles like magnums or split wine bottles? Are you looking to include wine display areas, tasting and decanting areas? Once you determine your preferences, submit your design request to one of our expert designers and we will provide a detailed set of drawings and a comprehensive pricing proposal for you.
We hope this gave you all the insight you need to start building a wine cellar!
Questions?
Contact our knowledgeable wine cellar experts to discuss how we can help make your dream wine cellar a reality. We love to help!SHARE: